Wednesday, November 4, 2009

Bathroom

This is what the bathroom turned out like after my little remodel job. Kerry stepped through the ceiling so I had to redo the ceiling and figured while I was at it I would redo the drywall on the walls. Since the walls were open I decided to put in insulation. Since the walls were open I decided to rewire the electric since they did a terrible job when the added on. Since the walls were open I decided to replace the galvanized water supply lines with PEX. Since the walls were open I decided to replace the galvanized drain lines with PVC. While the fixtures were out I noticed the left wall was 4 inches different from one wall to another in a 10 foot distance. I decided to rebuild the wall. I was going to tile the floor and couldn't get any wood to match the height of the subfloor so I went ahead and replaced the whole subfloor. But.... I was able to reuse the commode because I had just replaced it a year ago. I guess that is something.
Here is the bathroom after Kerry put the paint on the walls and I have the tile in but had to go to work before I could grout.

Monday, October 26, 2009

New deck

Since Kerry had such a good time helping on the roof I decided to reward her with a personal deck. Now she can sit right outside the bedroom window when the weather is nice and enjoy a book in private. She hasn't seen it yet so I hope she is surprised!
Here is a shot from a little farther down the roof.

And here is a shot of the new deck from the ground. I sure hope she is pleased.

Wednesday, October 7, 2009

New boat

I guess I should stay away from craigslist. I just have a hard time passing up good deals. I got this 1988 20ft cuddy cabin boat for 700 dollars. Just the trailer is probably worth that. I was going to buy it just for the engine parts that I need for my other project boat but this one is in such good shape I am going to keep it and put a new engine in this one.
You can tell how big it is when it is in the same shot as the Durango. I know, the last thing I need is another project... or another boat. I just couldn't resist.

Friday, September 18, 2009

Roof redo

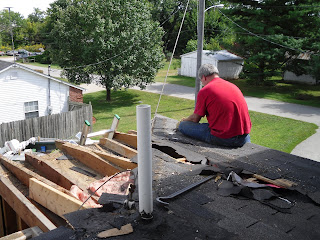
I finally made it home 2 and a half days late and Kerry and I were able to start our roof project. The roof that was on the small apartment addition to the back of the house was only a 1 and a half pitch and it was leaking. We needed to tear off the roof and build a new one.
We are going to be able to reuse the ceiling joists. This is a picture of one side after we pulled off all the roofing material and the rafters.
I used a metal cutting blade to cut the aluminum siding along the line of the new roof. You can see where the old roof line ran about a foot off the ceiling. The line is from the old flashing. The opening used to be the back door to the second floor apartment. I tried to get the pitch of the roof as high as I could without going into the window which is going to be in Kerry's bathroom.
This is how we left it for the night. I sure hope it doesn't rain. It is always fun to have a house open to the weather.

Tuesday, March 31, 2009

Door to nowhere...

Once again I was inspired by the Winchester House and decided to make a door to nowhere. I like it but I imagine eventually Kerry will make me put stairs up to it. This will be a door into the garage in the future. The stairs will go along side the wall.

This is the door from the inside. It isn't in permanent yet. I have to figure out what kind of exterior will be on the outside wall. Right now it has a layer of aluminum siding, a layer of wooden lap siding, and a layer of cellulose insulation board. It really isn't very fun to find more stuff to fix. I will probably have to tear off all the exterior wall and put up just a layer of OSB.


Once Kerry got home she helped me build a new set of shelves. The lumber was 60 bucks for this but it is 2 x 8 foot and has 4 shelves. With the 3/4 plywood shelves I think it will hold just about anything we load it down with.

Monday, March 30, 2009

stud farm

I started the new wall today! It is always nice to see some of the framing start to go up. It makes me feel like I am finally accomplishing something. I am going to remove both these windows. The one on the left will just be a wall and the one on the right will be an exterior door. This wall will be facing the garage so it won't need windows anyway.
I put the second layer of subfloor down. It was 5/8 particle board. The floor height matches now in the little apartment. I now will have to match it with the existing kitchen. I think I can do it with 1/4 inch plywood. The platform over the door is going to be covered with plywood and will be the floor to a storage area. I am also removing this window. It will just become a wall.

Saturday, March 28, 2009

Subfloor is down

Today I put in all the floor joists and glued and nailed down the stairs. The stairs now go somewhere.

I put down the first layer of the subfloor. I still need to put another layer of 5/8 particle board over the subfloor to bring it level with the old floor.
Here is a picture of the floor joists from the kitchen.

Tada! Another picture of the subfloor! I still have to build up a small wall and platform over the door.


Friday, March 27, 2009

Stair to nowhere...

I built a staircase just like they have in the Winchester House in San Jose, CA. It is a staircase that ends in the floor. Ok... I am going to cut out the floor though. The 2x10's are just set on the stringers for now. I have to get the last stringer in before I can nail them down.
Speaking of the last stringer... here it is. It is pretty easy to figure out how to cut out stairs nowadays. I just plugged the dimensions into a calculator online and it told me how many risers I needed and how big to cut them. Just to the right of this pic is the stairs that will be coming out tomorrow.

Sunday, March 22, 2009

B4 and after

We went down to the houseboat to fix up the bathroom a little bit. This is what it looked like when we bought it.

This is what it looked like when we left there on Friday afternoon. I built a new vanity at home and brought it down and installed it. Before we installed the vanity we put up new fiberglass reinforced panels on the walls.
I put up a shower and shower curtain. It was Kerry's idea to use hooks instead of trying to figure out how to put in a shower rod. I am glad she thought of it because I couldn't think of a very good way to put up a shower rod.

We also replaced the outlet with a white one. I would like to put in a GFCI outlet but they don't work without a ground wire. I have switches on the side of the vanity for the water pump and the toilet motor. The pump for the bathroom sink and shower is in the vanity. I have a water heater on the outside of this wall but it wasn't working so I brought it home to see if the manufacturer has any ideas.


Tuesday, March 3, 2009

Pade N Full

I finally am getting around to posting about our trip to the houseboat last weekend. I put up the new sign I made for the name of the boat. Only focus on the right top corner of the picture... don't look through the windows and see all the junk that is piled up in the boat. We took it all with us... honest.


Here is a closeup picture of the sign. I ordered a router template to use but I got tired of waiting for it. I just printed out the letters and used the router freehand. It isn't perfect but it is better than the one we had before. (we didn't have one)

The main reason we went down was to move this light fixture over so it would not be in the shower when I rebuild it. This is the before picture...


And this is after. You might have to go back and forth a few times to see the difference. =) The new ceiling cover is really bright white fiberglass. It has a really nice texture to it. I really need to replace the light fixture now though.


This is the way we left the bathroom. There is not much left. I pulled everything out so I could put the fiberglass sheets on the walls too. I figured that while I had the sink out I could redo the laminate and make it look better also. It is amazing how projects snowball.
I am on my way out of the country now. I will be home around the 11th of March to start working on the house again.


Thursday, February 26, 2009

Back to 4 working toilets!

This is the stairwell from the top to the bottom of the little apartment. On the other side of the plastic is the kitchen. The floor joists for the kitchen will be just above this new drain pipe. I might be getting a little ahead of myself putting in the drain already but I wanted Kerry to have her new potty.
This will all be unfinished when I get done. This is the bottom to the little apartment. The ceilings in here were only 7 feet tall and I doubt we will ever need this part of the house. I am going to use it for storage of all the boat stuff until we get a garage. The picture is so you can see the drain pipe running the 22 feet across the room.

Tada!! This is Kerry's corner potty! It is actually in the corner now. The room is unfinished with junk and lumber all over... but she has her own master potty now!


Tuesday, February 24, 2009

Oops!

Today I ran the 3 inch PVC pipe upstairs for Kerry's bathroom. You can see the pex tubing for the water supply running beside the PVC but I haven't secured it yet or anything.
This is the corner toilet that we are going to use in Kerry's master bathroom. I decided to set it up so we can use it while I work on her kitchen. Who knows how long that is going to be. You can see where the blue pex comes up in the corner. I will have to pull the toilet when I put in the ceramic tile. Right now it will just be sitting on the cement backer board.

This is the reason for the title. I was being very careful with the PVC primer because it tends to get everywhere. I had a plastic bag under the primer can while I worked on top of Kerry's new freezer that she got for her birthday 5 months ago. I moved a piece of PVC and the bag got caught and pulled the can over. PVC primer is designed to eat into the plastic and etch things... it did a pretty good job. This is now the permanent color of Kerry's freezer. Oops....


Thursday, February 19, 2009

More demo

This is a picture of the stairs that go to the lower part of the little apartment. The door is to the outside. I am going to make this into a floor and make the stairs go straight up from the door. It looks like we just got through grocery shopping but it is just the stuff from moving the pantry shelves

I still need to tear out this wall and the sink. I need to move the little stove and refrigerator. I am going to make another door to the outside where you see the window in this picture. It will have stairs outside that will eventually be in the garage I still have to build.


I put the plastic back up where the wall used to be. Now Kerry has her original size kitchen back while I am working.

This is her pantry shelves we moved up from the lower section of the apartment. It won't take Kerry long to fill it back up with all the stuff.
Tomorrow Kerry and I are going to Louisville to attend the National Houseboat Show. I am sure that there is nothing there that we will be able to afford but... it will be fun to look. We are spending the night in Louisville at a Holiday Inn Express that I was able to use my frequent stay points to pay for it with. I hope I get lots of ideas that I can do myself to improve our houseboat.


Wednesday, February 18, 2009

Hole in the wall

I was successful in making two rooms one. It sure is a dusty mess to do the demolition. My sawsall worked much better when I put a new blade in it. The sawsall was the first electric tool that I bought and I still have it. It works wonders.
From this angle you can see that we will be adding quite a bit more room to the kitchen. It used to be the top floor of a 500 square foot apartment. There was a full bath, full kitchen and a closet in this 240 square feet.

Tomorrow I will be taking down the rest of the walls in there so I can begin with a clean slate. We still haven't decided exactly how we are going to arrange things. The stairs take up a lot of space and I just started thinking tonight that I might just not make stairs and make the bottom half only accessable from the outside. It will sure make a lot more room.


Tuesday, February 17, 2009

Beam me up...

After much ado I finally got the wall down where the beam is going to go. The wood is very old and hard and the nails are stuck in the wood really good. I was glad that my temporary wall held and the house didn't fall down when I took out the studs holding up the wall.

Kerry and I struggled getting the beam up there. It is up about 8 foot 3 inches. I stood in the middle and heaved it up and Kerry guided it from the end. I sure am glad that she likes to help.


I now have the beam in place and the cripple studs in. I took down the temp wall. It sure did come down easy since I only had it duct taped together. I now can pull down the rest of the wall and move the plastic sheet so Kerry can have the whole kitchen back. The plastic has worked okay so far... there is only a light coat of dust on the floor throughout the first floor.

Monday, February 16, 2009

Temporary wall

I built a temporary wall in the kitchen so I can knock out the wall. I am going to put a beam in to span the 10 foot opening.

I had to get 10 foot 2x4's because the ceiling is so high. I don't have them nailed so I hope it all works out and the wall doesn't fall apart. There is a temporary wall just like this one in the room above on the second floor. If the house wasn't so old it would have been built with platform framing and I could have just built the wall here in the kitchen and it would have been enough. With the kind of framing that was used (balloon framing) the second floor floor joists do not support the wall above it. Houses since around the mid 50's have been built with platform framing and it would have been much easier.


This is the beam I plan on using. I used liquid nails and glued together two 2x12's with 1/2 inch plywood in the middle. I nailed it all together with 20 penny nails. It is 10 feet long and I think it will be plenty strong enough.